Launching VFX book to number 1 best-seller spot on Amazon

Launching a book to Amazon has several different stages. i. Writing the best book you can ii. Converting it into an ebook iii. Selecting a place to sell it - Amazon vs the rest iv. Finding your target audience - twitter vs the rest v. Marketing to that audience I'll deal with each of these stages in turn

How to set up your own VFX Studio - business considerations

In this post I am going to guide you through the process of how to set yourself up as a your very own VFX studio. In practice this post can relate to setting yourself up as your own business, whatever industry you are in, but seeing as this a VFX oriented site I'll use the business model of a VFX studio for the purpose of this exercise.

How to put VFX and animation into your film

I've been asked so often how to integrate VFX and CG into film by low and no budget filmmakers. I've written a quick guide on how you can put in VFX and CG into your movie, whatever budget you are working at this process will work for you. Follow this simple process

VFX Cloud Studio 2.0 - What it means for Producers and Artists

This post is about what is in it for an independent film producer to come directly to the artist and what can the artist do to make sure the work is delivered to schedule and budget?

This is default featured slide 5 title

Putting a budget together at the start is definitely a useful (if not wholly inaccurate) exercise. It helped me plot out what I needed to do, all the tasks that would be involved in making this happen. And there were a lot of tasks that needed to be done.

Monday 17 March 2014

Maya to Houdini Conversion Course: Part 2c - collisions, how to playblast in Houdini

In this lesson you will be able to start creating particle collisions, adjusting colours, creating different instances of geometry onto your particle simulation and quickly and easily preview them in Houdini's equivalent of a playblast.

In lesson 2c you will learn
  • collisions
    • how to set up a collision POP
    • adjusting collision attributes
  • Creating instanced Geometry
    • In Houdini you use a Copy SOP to set up instancing
    • How to wire any geoemtry and particle simulation into a Copy SOP
  • Colouring Particles
  • Setting up a Playblast in Houdini
    • a playblast in Houdini is called a Flipbook
    • How to set Flipbook parameters
    • How to use the Flipbook viewer
      • The Houdini of FCheck is called MPlayer
      • What MPlayer can do that FCheck can't


The Full list of videos in the Maya to Houdini Conversion Course series here

Enjoy the lesson.

Please do use the share buttons to tell other artists who may be struggling with the switch across from Maya to Houdini.

Watch other videos in the Maya to Houdini Conversion Course series here

Why I created the course?

I've been working as a VFX artist for over ten years, one of the most common questions people ask when moving across from Maya to Houdini is 'how do I do xxxxxxx in Houdini, it's so easy in Maya, but I can't find the function in Houdini'.

Well the fact is that every software is different, not only do the functions have different names but different 3D software is built upon a whole architecture. To shift from Maya to Houdini requires to understand how the two pieces of software were built upon different architecture.

Tuesday 4 March 2014

Maya to Houdini Conversion Course: Part 2b - Particle expressions, key frames and graph editor

This lesson will give you the confidence to start using and adjusting basic particle simulations, you'll gain access to the animation controls and expression editor which you can use in other parts of the software


 In lesson 2b you will learn
  • keyframing
  • seting up emissions attributes
    • impulse activation
    • constant activation
    • birth rate
  • middle mouse button to see particle states over a node
  • setting up expressions
    • where to create an expression
    • deleting expressions
  • Setting key frames
    • where keyframing lives
    • adjusting keyframes
    • how the graph editor works
      • how to access the graph editor using scope parameters
      • adjusting keyframes in the graph editor
      • adjusting tangents in the graph editor
  • switching between nodes without simulating them
  • setting up fields - Fields are called Forces in Houdini

The Full list of videos in the Maya to Houdini Conversion Course series here

Enjoy the lesson.

Please do use the share buttons to tell other artists who may be struggling with the switch across from Maya to Houdini.

Watch other videos in the Maya to Houdini Conversion Course series here

Why I created the course?

I've been working as a VFX artist for over ten years, one of the most common questions people ask when moving across from Maya to Houdini is 'how do I do xxxxxxx in Houdini, it's so easy in Maya, but I can't find the function in Houdini'.

Well the fact is that every software is different, not only do the functions have different names but different 3D software is built upon a whole architecture. To shift from Maya to Houdini requires to understand how the two pieces of software were built upon different architecture.

Monday 3 March 2014

Maya to Houdini Conversion Course: Part 2a - Particle Set up

This lesson will quickly and easily get you up and running with particles in Houdini and lays the foundation for further particle exploration


 In lesson 2a you will learn
  • Basic particle setup in Maya versus Houdini
  • Going beyond the shelf buttons to construct your own particle objects
  • What the POP node is
  • Different types of emitters and how to source particles from polygon objects
  • First object context geometry
  • How to collect particles together using the collect POP
  • setting 
    • timeline, 
    • FPS, 
    • playback settings, 
    • oversampling, 
    • sampling rate, 
    • maximum number of particles, 
    • setting the pre-roll 
  • How to read error messages using the middle mouse button
  • further traversing the context menus within Houdini

The Full list of videos in the Maya to Houdini Conversion Course series here


Enjoy the lesson.

Please do use the share buttons to tell other artists who may be struggling with the switch across from Maya to Houdini.

Watch other videos in the Maya to Houdini Conversion Course series here

Why I created the course?

I've been working as a VFX artist for over ten years, one of the most common questions people ask when moving across from Maya to Houdini is 'how do I do xxxxxxx in Houdini, it's so easy in Maya, but I can't find the function in Houdini'.

Well the fact is that every software is different, not only do the functions have different names but different 3D software is built upon a whole architecture. To shift from Maya to Houdini requires to understand how the two pieces of software were built upon different architecture.

Maya to Houdini Conversion Course: part 1c - Grouping and Transforming

This lesson will quickly and easily push you beyond the top layer in Houdini and you will leave understanding the different mindset required to quickly and easily start using Houdini.


 In lesson 1c you will learn
  • How to group objects together
  • How to transform the whole group
  • How to transform individual elements of grouped objects
  • Layout options in Houdini 
    • maximising the viewport
    • creating extra attribute editors
    • linking windows to follow each other
    • how to have windows stay independent of the selection
    • colouring nodes
    • creating netboxes (what a netbox is) and colour those
  • How to ghosting other objects
  • Where the wireframe and shaded displays buttons live 

The Full list of videos in the Maya to Houdini Conversion Course series here


Enjoy the lesson.

Please do use the share buttons to tell other artists who may be struggling with the switch across from Maya to Houdini.

Watch other videos in the Maya to Houdini Conversion Course series here

Why I created the course?

I've been working as a VFX artist for over ten years, one of the most common questions people ask when moving across from Maya to Houdini is 'how do I do xxxxxxx in Houdini, it's so easy in Maya, but I can't find the function in Houdini'.

Well the fact is that every software is different, not only do the functions have different names but different 3D software is built upon a whole architecture. To shift from Maya to Houdini requires to understand how the two pieces of software were built upon different architecture.

Maya to Houdini Conversion course: Part 1b - Getting around Houdini

In this lesson you will understand the differences between the Maya and Houdini workspace and how the concept of contexts in Houdini differ from the Maya workflow.  You will leave understanding the different mindset required to quickly and easily start using Houdini.


 In lesson 1b you will learn


  • How Houdini contexts differ from Maya workspace 
  • How Houdini lets you go deeper into object mode than Maya does 
  • Using the tab pop up menu feature 
  • How to create the basic primitives in Houdini and how their names differ in Maya 
  • How to go beyond the shelf buttons and really understand how the context based system in Houdini works
  • How to show/hide objects in Houdini
  • Chaining items together
  • How to merge multiple items together


The Full list of videos in the Maya to Houdini Conversion Course series here


Enjoy the lesson.

Please do use the share buttons to tell other artists who may be struggling with the switch across from Maya to Houdini.

Watch other videos in the Maya to Houdini Conversion Course series here

Why I created the course?

I've been working as a VFX artist for over ten years, one of the most common questions people ask when moving across from Maya to Houdini is 'how do I do xxxxxxx in Houdini, it's so easy in Maya, but I can't find the function in Houdini'.

Well the fact is that every software is different, not only do the functions have different names but different 3D software is built upon a whole architecture. To shift from Maya to Houdini requires to understand how the two pieces of software were built upon different architecture.

Maya to Houdini Conversion Course: Part 1a - where commonly used items in Maya live in Houdini

Welcome to the Maya to Houdini conversion course in this lesson we'll go through through the course outline and what a Maya artist needs to know when moving across to Houdini.  We'll go through the interface so you can quickly and easily navigate your way around in Houdini as you do in Maya.


To shift from Maya to Houdini requires to understand how the two pieces of software were built upon different architecture.

In lesson I you will learn

  • Introduction
  • Why I'm creating this course
  • How this course will help you
  • How Maya and Houdini are different
  • How Houdini lets you go deeper into object mode than Maya does
  • How to create the basic primitives in Houdini and how their names differ in Maya


The full list of videos in the Maya to Houdini Conversion Course series is here

Enjoy the lesson.  


Do please share using the social buttons below.

Watch other videos in the Maya to Houdini Conversion Course series here

Why I created the course?

I've been working as a VFX artist for over ten years, one of the most common questions people ask when moving across from Maya to Houdini is 'how do I do xxxxxxx in Houdini, it's so easy in Maya, but I can't find the function in Houdini'.

Well the fact is that every software is different, not only do the functions have different names but different 3D software is built upon a whole architecture. To shift from Maya to Houdini requires to understand how the two pieces of software were built upon different architecture.

Sunday 5 January 2014

Nitro Dust - how to make an animated movie in 4 days


Hi everyone, I recently finished directing my second animation of the year 'Nitro Dust' a psuedo-prequel to Digitopia: Discover Me, Nitro Dust is set in the same universe a little earlier in the timeline of the story.


I had a small team of artists and we made this movie in just four days.  In this blog post I'm going to take you beyond the technical set up required to create an animated movie in four days and we'll explore the human story and how you too can create a top quality animated short film in a short space of time.


Basically I had four days to make this movie before screening it at a cinema, I had a confirmed booking and an audience of over a hundred who were attending a private screening event.

I committed to making this movie - less than a week before the screening I had no team together to make this film, this is the story of how I put a team together and got them to produce this stunning animation in less than four days.  

First before we begin, enjoy the movie...


Tuesday 20 August 2013

Fable Legends announced

The game I'm working on is finally announced - it's called Fable Legends.


Here's the trailer.


Here's an interview on the IGN website that should answer a lot of the questions that you have.

Monday 29 July 2013

How to put VFX and animation into your film

I've been asked so often how to integrate VFX and CG into film by low and no budget filmmakers.  I've written a quick guide on how you can put in VFX and CG into your movie, whatever budget you are working at this process will work for you.  

Follow this simple process

i.                     Find out who you need to do the  job
ii.                   Define and gather reference
iii.                  Previz
iv.                 Visual Target
v.                   Integrate into the backplate

Stepping through these one at a time we’ll drill down to the core of how you can get your animation integrated into your film on time and on budget


i.                     Find out who you actually need to do the job


This is quite important thing to understand at the start, the range of different jobs involved in bringing a visual effect or particular animation to life is quite intense.  I speak about it in great detail in my book ‘VFX and CG Survival Guide for Producers and Filmmakers’ going through what each job role does and how the dependencies between different artists work.  Here for the sake of brevity I’ll give you the bare bones of what you need to know. 

If you want a character to animate

You are going to primarily be looking for an animator. 

The animator needs some support people or materials, i.e. he/she (I’m going to dispense with the ‘he/she’ construct from hereon) will need
-          a model and
-          a control rig to animate. 


Fig 1. An animator needs a model and a rig before she can start the animation

Friday 19 April 2013

VFX Cloud Studio 2.0 - What it means for Producers and Artists

Hello everyone, buoyed on from the success of VFX and CG Survival Guide for Filmmakers and Producers (Kindle - http://amzn.to/WTZByQ) I've been approached by independent film producers to provide VFX for their projects.  The requests have come from far and wide, some asking for quotes others asking me to carry out the work.

This post is about what is in it for an independent film producer to come directly to the artist and what can the artist do to make sure the work is delivered to schedule and budget?

What does it mean for Filmmakers and Producers?


Firstly the producer is going to get his/her VFX done for a fraction of the cost that it would take to do if he/she went to a facility.  Some producers are more realistic than others, some will expect the effects to be on par with that of a facility, others realise what a good deal they are getting but still expect a level of quality that would be at least half the quality they would get from a facility.

To contrast the deal a producer would get from a studio to going directly to a VFX artist here are the rate cards of a highly respected VFX company

Mill Rate Card in £ Source: http://www.themill.com/media/214554/london_rate_card_lndscpe.jpg

Mill rate card in US $, source: http://www.themill.com/media/214560/usa_rate_card_lndscpe.jpg

Edit19 Rate Card, source: http://www.edit19.co.uk/wp-content/uploads/2012/04/E19_Rate_Card_2012_v01.pdf

Friday 1 March 2013

Launching VFX book to number 1 best-seller spot on Amazon

So the past month I have been really busy launching my book 'VFX and CG for Producers and Filmmakers' on Amazon.


Paperback


US and International -> http://www.amazon.com/Survival-Producers-Filmmakers-Guides-Volume/dp/1484021541/
UK -> http://www.amazon.co.uk/Survival-Producers-Filmmakers-Guides-Volume/dp/1484021541/
Austria and Germany -> http://www.amazon.de/Survival-Producers-Filmmakers-Guides-Volume/dp/1484021541/
France -> http://www.amazon.fr/Survival-Producers-Filmmakers-Guides-Volume/dp/1484021541/
Italy -> http://www.amazon.it/Survival-Producers-Filmmakers-Guides-Volume/dp/1484021541/
Spain -> http://www.amazon.es/Survival-Producers-Filmmakers-Guides-Volume/dp/1484021541/

Kindle


US and International -> http://www.amazon.com/Survival-Producers-Filmmakers-Guides-ebook/dp/B00BDV8GY2
UK -> http://www.amazon.co.uk/Survival-Producers-Filmmakers-Guides-ebook/dp/B00BDV8GY2
Canada -> http://www.amazon.ca/Survival-Producers-Filmmakers-Guides-ebook/dp/B00BDV8GY2
Austria and Germany -> http://www.amazon.de/Survival-Producers-Filmmakers-Guides-ebook/dp/B00BDV8GY2/
France -> http://www.amazon.fr/Survival-Producers-Filmmakers-Guides-ebook/dp/B00BDV8GY2/
Italy -> http://www.amazon.it/Survival-Producers-Filmmakers-Guides-ebook/dp/B00BDV8GY2/
Japan -> http://www.amazon.co.jp/Survival-Producers-Filmmakers-Guides-ebook/dp/B00BDV8GY2/
Spain (and Latin America) -> http://www.amazon.es/Survival-Producers-Filmmakers-Guides-ebook/dp/B00BDV8GY2/


I started writing the book in July 2012 and launched it in February 2013, again much like my film making this has all been part time after work and getting two kids to bed - whatever energy I could summon I put into the book.

I launched the book in the middle of February and managed to get it to number one on Amazon under the following categories within 48 hours of launch - it was a massive undertaking which I'll detail for you below.

Fig 1. Putting the book up on Amazon and getting it to number 1 on the 16th Feb 2013 in its relevant categories

Friday 4 January 2013

How to set up your own VFX Studio - business considerations

In this post I am going to guide you through the process of how to set yourself up as a your very own VFX studio.  In practice this post can relate to setting yourself up as your own business, whatever industry you are in, but seeing as this a VFX oriented site I'll use the business model of a VFX studio for the purpose of this exercise.

Most of us VFX and animator types are employed as freelancers or contractors, there are very few staff positions in this industry so knowing how you can maximise, conserve and stretch your pay is really vital especially in the economic climate we find ourselves in.  A lot of the specifics that I will mention relate to UK tax law, it is the same concept whichever country you are in, they just have different names and are set at different level (maybe you can substitute in the names and percentages in the comments below for your own country).

I am going to use an example to show how you can earn the same day rate but take home more money, all names and figures are arbitrary, so don't be disheartened if the pay scale is not what you are receiving or seems too low, I'm using round numbers purely for simple illustration.  None of this is meant as legal or financial advice, please consult your own accountant for this.

Why set yourself up as a limited company?


Setting yourself up as a limited company is quite simple to do in practice, but there are a few initial tasks and then many continuous tasks that you'll need to dedicate time to.  So you are probably wondering why go through all of that in the first place.

Well the answer is simple and can be summed up in two words.

SAVING TAX 

yes it's that simple all the extra admin that you will do is simply to save you some/a lot of tax.

Let's look at an example, in the UK there are various tax bands (again these bands exist in your own countries, they have different names and are set at different rates but they do exist) understand how the tax system works and where you fit into it and you will see how advantageous and worthwhile the extra admin is.

From the HMRC website http://www.hmrc.gov.uk/budget2012/income-tax-rates.htm (what a thrilling read that is)

'For 2013-14, the main rates of income tax will be the 20 per cent basic rate, the 40 per cent higher rate and the additional rate will be reduced from 50% to 45%.'

i.e. when you earn more than £42,475, you can expect to pay 40% on that amount.  Most if not all VFX artists that I know earn more than this amount.  Therefore they are losing (I mean paying) 40% of any money above this figure.

Using the http://iknowtax.com/2013/ calculator, someone on a day rate of £200 will essentially take home £50k, assuming a two week holiday.

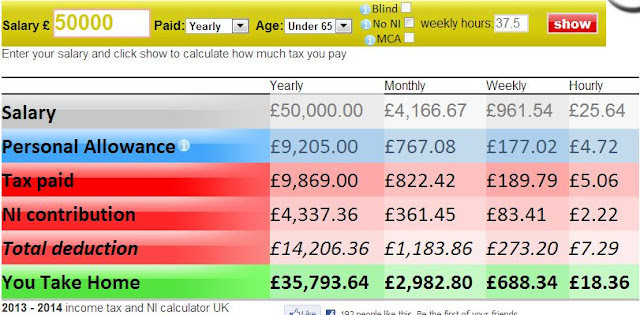
Fig1. Take home £35,793 when you earn £50,000


Now imagine you are on a day rate of £300, i.e. £75,000, a perfectly reasonable amount for an experienced VFX artist.

Fig 2. Take home £50k when you earn £75k


You can see now that you are really only taking home two-thirds of your pay.  What essentially is happening is that you are being taxed at a standard rate of 20% after your personal allowance (i.e. the first £7,800), then taxed at 40% after you reach £42,475.  Therefore if you are earning these kinds of money as a freelancer you are going to be taking home two-thirds of your pay.

Now contrast that with being a limited company where you would pay 20% on any pretax profit.

So how do you work out pretax profit?

Well before we talk about that we are going to talk about another tax, in the UK it is called Value Added Tax (VAT), don't worry this isn't necessarily a bad tax, well that is to say it's not one that you will have to pay, but moreover, one that you will charge to your client.  VAT is currently charged at 20% therefore for example if you were to charge as per our first example above, £200 a day, you would add on 20% to that.

£200 + 20% = £240 a day.

But here's the clever thing about charging VAT
i. your client can claim that back, thus reducing their pretax profit by the VAT you have charged them and
ii. you don't pay the full 20% to the government, you pay 14% of that, or 13% if you are trading in your first year, assuming that you are not on the flat rate scheme, if you are then you pay the full 20%.

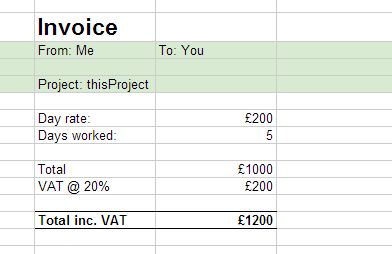
In practice that means, you do a week's work at £200 a day.  You bill them as in fig 1.3

Fig 3. Charging VAT at 20%


now the Inland Revenue will charge you 14% or 13% if you are in your first year, i.e. they will charge you 13% of £1200, i.e. you pay the Inland Revenue VAT of £156 (at 13% if it's your first year)

therefore you make £44 extra, which is an extra 7.3%.

When you consider that this £200 extra in VAT didn't exist when you were a freelancer, it is a win-win situation.  The client reduces their tax exposure by £200, you made £156 for the exchequer and you pocket £44 yourself for the trouble.  Extrapolate that out to a year...

Now onto the aspect of your own tax bill and reducing it through expenses and wages.

First are you married, with a partner?  If yes, is that partner working?  If the answer is 'no' then  you can pay them a wage too.  This is how it works using a simple profit and loss equation using yourself and your partner (who isn't currently working) and whatever expenses you can charge (more on allowable expenses below)
Fig 4. pay yourself and your partner a wage reduces your tax liability
In Fig 4. You can see how paying yourself and your partner a minimum wage (currently in the UK set at £650 a month) and the company's expenses you end up paying corporation tax of £211.60 on earnings of £3000, i.e. less than 10%.

Now if you have a child who needs to go to nursery, you can have the nursery invoice the company directly as a service provider.  Fig 5 shows how that affects your tax payment
Fig 5. Having the childcare provider directly invoice the company will reduce the tax bill further

Now if the nursery charges £500 a month say then your tax bill is now 4.8% (£146/£3000) from the 40% that you would have been paying (assuming this month's payment was over the standard rate tax threshold).

All in all you can see how setting yourself as a limited company is going to make sure you keep more of your hard earned money.  

Question: Why are you paying yourself minimum wage?

You do this so that your personal income stays below the standard rate tax threshold, i.e. so you don't pay income tax.  Your tax payment should go through your corporation tax or at least the majority should go through the corporation tax.  

Question: What are allowable business expenses?

Anything that is directly involved in you doing your job.  Examples include
- computer hardware related to your job
- computer software related to your job
- training courses/books related to your job
- travel to see clients (note that commuting is not allowed, but if you have a contract that is less than 40% of the year, you can claim that travel cost)
- home office provided that you use the home office for actual work purposes you can then apportion a percentage of your mortgage/rent and bills to the expenses, for instance 
  • one of your rooms in your five room apartment you use exclusively for a home office, then you can put 20% of the mortgage and bills through as a business expense.  
  • If you use this room half the time for work and half the time for non work then you can apportion 10% of the associated costs as a business expense.
Note that the amount you set this split is the amount of time the room is used not the total time in the week, for instance if you get home and have four hours in the evening, then you measure how much of that four hours is spent for work and how much spent for leisure.

Question: why is there a £100 charge for an accountant?

See how much money he/she saves you, it's a cost worth having.

Question: my wife/girl friend is pregnant, can she claim maternity pay?

Congratulations (I hope you find the guy who did it :), yes she can so long as she has been employed for more than twenty four weeks.

How to set yourself up as a limited company?


This is really simple

  1. Find a good accountant, he/she will do most of the work - this will take about an hour
  2. Fill out the forms they give you, don't worry - this will take ten minutes
  3. Go to the bank and tell them you want to open a business account, that you will need two accounts, one a current account (where you will get paid) and the other a deposit account (where you will put aside any tax money to be paid to the inland revenue) this will take about an hour
  4. Say no to the bank when they try to sell you a slew of useless products for your new business account - this will take about an hour plus time on the phone as they will continue to call you afterwards since you are now a valued business customer
  5. Give all the details back to the accountant, he/she will send you a form to sign and then wait for the paperwork to come through. - this will take ten minutes to collate and send


What will it cost you?


Money
Accountant about £100 a month, i.e. £1200 a year
Payroll about £300 a year (you could do it yourself but it is a real hassle, most accountants have payroll departments attached)

Time
About a week of solid work to set up and running.
An hour each month (spread out over the whole month) to collate all your expenses - collecting and organising receipts
An hour each month to calculate your expenses
An hour each month to make all the bank transfers

Is it immoral?

People who aren't doing it will make you feel that it is (they're just upset that they are too lazy or not as smart  as you to have figured it out) but no it isn't and anyone who says it is is an idiot.

You are running a business, every business has costs.  If you ran a sandwich shop would you not write the bread, the cheese, the salami off as a business cost?  Would the knives, plates, grill not be legitimate business tools?  Would you not have to pay the electricity bill?  Would you not pay your staff?

Running a VFX Studio means you have to pay a slew of costs as well, just like in any other business you subtract these costs from your revenue to work out your net profit.  You then pay corporation tax on this figure.

Anyone who tells you otherwise, point them to the fact that you charge value added tax @ 20%.  That is 20% extra money that never existed if you were on Pay as You Earn (PAYE).  In the example above you have made £600 extra on an earning of £3000.  If you were on the flat rate VAT scheme all that £600 would go straight to the exchequer, i.e. that's 20% up front straight away into the tax pot - how it will be squandered from there is the civil service's responsibility


Sunday 30 December 2012

London Newmian Games

I recently finished a job working on Olympics presentations for the recent games here in London. I worked on the lighting and effects for the various 2012 logos. I lit these 2012 stings that appear on the giant jumbtrons. Any time any event is about to take place the 2012 logo will fly right on screen and the title of the event would be displayed.


jumbtrons from Farhan Qureshi on Vimeo.

There was a team of six of us in a lofty sunny room in Farringdon working on this - we actually worked in a rather convulted way, working from Maya to 3DS Max to Cinema 4D into AfterEffects with some Nuke in between.

Somehow it seemed to work. Oh yes and I was helping set up the render farm to configure it with all these different renderers.


lighting: mental ray for maya from Farhan Qureshi on Vimeo.

We got the model from another company in Maya, the animation was done in 3DS Max but the initial shading and lighting was done in Mental Ray in Maya. I took the animations back and recreated the shading and lighting network. I installed Mental Ray on the farm using Deadline (no mean task in itself).

I also did the effects on a sponsor movie, where Wenlock dives in and out of a swimming pool (Maya fluids and nParticles) and pulls down a cloth at the end (nCloth).


water sims from Farhan Qureshi on Vimeo.


Cloth Sims from Farhan Qureshi on Vimeo.
Video: Wenlock water + cloth effects

 The third thing I did was some of the after party graphics where we could deviate from the brand guidelines as we pleased. Video: distorted 2012
Distortions Effects from Farhan Qureshi on Vimeo.

Friday 27 January 2012

Naiad R&D

So I've been busily furrowing away learning Naiad.  I thought I'd share some of my first tests with you and how I went about doing these.

Naiad test 01 - firing liquid against a wall


Naiad test 01 from Farhan Qureshi on Vimeo.

Naiad test 02 - a block crashing into liquid


Naiad Test 02: Block crashing into water from Farhan Qureshi on Vimeo.

Naiad test 03 - trudging through thick liquid


Naiad test 03: block trudging through thick fluid from Farhan Qureshi on Vimeo.


Naiad Test 04: Rigid body collision

So firstly I should say massive thanks and point you in the direction of two excellent training resources that will get  you up to speed very quickly on learning Naiad
first is the excellent CMIVFX site who have an equally excellent Naiad training kit available here
http://www.cmivfx.com/tutorials/view/331/NAIAD+Simulating+Liquids+Volume+1

The other is a free one hour getting started tutorial from Exotic Matter themselves which you can find here
http://www.exoticmatter.com/naiad-training-videos/

After you manage to install Naiad which is no mean feat in itself then you need to learn how to build a graph.  I won't go into the graph building here as there are lots of other resources that will do that for you, but I'll focus on controlling the fluids and some of the considerations you'll need to take into account if you're coming from a Maya or Houdini background.

So first if you're used to Maya then this is going to be more difficult (Naiad is built on the same node based workflow as Houdini) , but it's more a case of looking at it in a different way.  Here you have to build and link each node individually to make a network - it may be the case later that these networks are compiled into a single button, much like Houdini now does.

I'll attack the graph in stages so it's not overwhelming

Setting up a particle and emitter

so the node at the bottom you can think of as an emitter.  It needs two inputs the one on the left is the particle input, here you'd specify all the properties of a particle much as you would in Maya.

The branch on the right think of it as your emitter shape.  Here I've set up a simple box shape.  In order for the emitter to read that in it needs to go through a couple of extra nodes, first a MeshVolume which turns the Box_Mesh into a volume which is how Naiad interacts with particles.  Next that volume is is exported through a Field-Export.  Notice the circle and square shapes here.  The emitter node has a number of input plugs which are also circular and square.

Circles are bodies and meshes, squares are fields.
Basic rule: circles plug into circles and squares plug into squares.

You'll notice also a lage 'G' node and a camera scope - The 'G' node is the globals, it's where you set  your project preferences and the like, the camera scope allows you to visualise the 3d scene - more about scopes later.

Next we need to collide it - here I'm colliding it with the floor


Again same deal here, we need to turn that mesh into a volume.  We then plug both of these into a 'Join' node.


Add some gravity (which is a node called acceleration) and dynamics which will make trigger all these forces and collisions.

The join then goes into acceleration which by default is set to -9.81 in the y axis.  You can of course change this.

The Dynamics node will make it all work.

I've put in a particle-Kill-Plane at the end.  This will basically kill any particle below the level I place it at.  You can of course change it to kill particles above a the kill plane if you wish.  This will speed up the simulation time as you may not be interested in calculating particles that are outside of the bounds that you care about.  There's also a killmask that will allow you to define better the area you want to cull particles from.


Finally to output and view the simulation you will need an Emp-Terminal node with a scope attached to it.


Terminals come in two different flavours - an EmpTerminal will recursively write out every step (frame) to disc so you can scrub back and forth afterwards.  A regular terminal will not and everything is held in RAM.

the scope here is a Particle-Scope, there are different scopes for different bodies.  If you want to visualise a mesh you'll need a mesh scope.

Once that's all written out you'll most likely want to visualise it as a mesh not a particle system.

You'll need to set up three new nodes, either to the side in the same file or in a new file.


First you'll need to read back in the particles that you wrote out, you do this with an Emp-Read node and point the directory to where you output the particles in your Emp_Terminal.

The Particle-Mesh3 node will then take those particles and mesh them out into a polygon for you to take back into your lighting pipeline.

The meshing parameters will help you make it smooth or rough.

Step through the graph again and it will write these out as .emp files for you to bring back into Maya/Houdini as you'd like.

Quick tip: to run through your scene faster use the left most button 'Launch Naiad' of the stepping buttons to step through the scene outside of the current instance of the programme.


This will open up a new window where you can specify more threads to use - you can use them all and increase the processing speed.

You can choose to run Naiad on any file from here, so you don't even need to have your file open.  I'm sure various studios have this linked into the render farms so you could really speed up your sim time.

Here I've set it up to use all 8 threads that I have. 


 If you're unsure of how many threads there are available on your machine just run the Task Manager and click on Performance, that will show you all the machine's threads.


Hope this was useful in explaining how I got these sims done, for a more exhaustive explanation of all the nodes see the learning resources I gave at the top.

Thanks

Thursday 26 January 2012

Jelly on a plate served by Houdini

I was playing around with the new fluid solver in Houdini 11. I came up with a pretty cool jelly animation by adjusting the viscosity settings and collision tolerances.


Here's the basic setup and settings


The basic set up
   Geo:
      basic box shape with a smoothing operation to create the shape
      cutter geo - which we'll reference into the collision object below

   Dynamics
        The AutoDop network - which is created from the shelf
        The output mesh - i.e. the dough/jelly shape with dynamics applied
        The ground plane

    Lights:
          Lights and shaders live here

Dynamics - The AutoDop network


From left to right:
    left branch - : the cutter which needs two nodes to make it cut through the jelly
    middle branch - the ground plane for the jelly to land/sit on
    The right branch: the particle fluid feeds into the solver (settings below)
    At the bottom a file node so we can cache it easily


The particle fluid object nde

I ramped up the Rest Density to viscosity to really high numbers, this helps the Jelly sit in place and not collapse as it lands.

You can see in the SOP path that it's pointed to the obj/dough_shape that we made at the start.


on the solver I found these useful elasticity and plasticity settings that keeps the fluid  stuck together when the cutter comes into contact, watch the video closely and you'll see that the fluid tries to adhere itself back together - you can see that in the image below how the particles stick together.
Tip: keep the gas constant set at 400, changing this too much causes unpredictable results - the Houdini docs recommend a value of 400, so best not to stray too far from that.


Animation

This is very quick - the only piece of animation was on the cutter which I used to cut the jelly.  The sim will respond to any kind of animation that you can throw on the cutter.


Shading

I initially tried a clay shader as I was trying to to make dough, I wasn't overly pleased with the results so I switched it to a glass shader with a tinge of red - hence the jelly look.

under the displacement tab I added ramp (a simple red to green) and a small amount of displacement.  You can see this result at the start of the video where the playblast is in the top corner.


In the noise tab I checked on the 'Do Noise' button, I bumped up the frequency and turbulence to create that nice texture on the jelly.


The lighting came out really nicely casting a red shadow with all the noise coming through on the ground plane.  I think it took about two to three minutes to render each frame - then again I had the render farm to myself so it was really quick.  Hope  you like it.

VFX and CG from Film Producers and Filmmakers

My book 'VFX and CG from Film Producers and Filmmakers' will teach you how you can create your own animated movie and add CG/VFX into your own film


Latest reviews for VFX & CG Survival Guide for Producers and Filmmakers from Amazon


you can buy your copy here

Paperback


US and International -> http://www.amazon.com/Survival-Producers-Filmmakers-Guides-Volume/dp/1484021541/
UK -> http://www.amazon.co.uk/Survival-Producers-Filmmakers-Guides-Volume/dp/1484021541/
Austria and Germany -> http://www.amazon.de/Survival-Producers-Filmmakers-Guides-Volume/dp/1484021541/
France -> http://www.amazon.fr/Survival-Producers-Filmmakers-Guides-Volume/dp/1484021541/
Italy -> http://www.amazon.it/Survival-Producers-Filmmakers-Guides-Volume/dp/1484021541/
Spain -> http://www.amazon.es/Survival-Producers-Filmmakers-Guides-Volume/dp/1484021541/

Kindle


US and International -> http://www.amazon.com/Survival-Producers-Filmmakers-Guides-ebook/dp/B00BDV8GY2
UK -> http://www.amazon.co.uk/Survival-Producers-Filmmakers-Guides-ebook/dp/B00BDV8GY2
India -> http://www.amazon.in/Survival-Producers-makers-Guides-ebook/dp/B00BDV8GY2/
Brazil -> http://www.amazon.com.br/kindle/dp/B00BDV8GY2/
Mexico -> http://www.amazon.com.mx/kindle/dp/B00BDV8GY2/
Canada -> http://www.amazon.ca/Survival-Producers-Filmmakers-Guides-ebook/dp/B00BDV8GY2
Austria and Germany -> http://www.amazon.de/Survival-Producers-Filmmakers-Guides-ebook/dp/B00BDV8GY2/
France -> http://www.amazon.fr/Survival-Producers-Filmmakers-Guides-ebook/dp/B00BDV8GY2/
Italy -> http://www.amazon.it/Survival-Producers-Filmmakers-Guides-ebook/dp/B00BDV8GY2/
Japan -> http://www.amazon.co.jp/Survival-Producers-Filmmakers-Guides-ebook/dp/B00BDV8GY2/
Spain -> http://www.amazon.es/Survival-Producers-Filmmakers-Guides-ebook/dp/B00BDV8GY2/


*BTW you don't need to own a kindle to read this, you can download a kindle app for you smart phone or tablet from your app store or 
or get the kindle cloud reader which will allow you to read kindle in your web browser here ->https://read.amazon.com/about


Thanks