I have just last night completed the first pass of lighting, in all I have lit 54 shots in two weeks. Given that the typical work time is two hours per day (starting at 10pm), that works out to almost <gasp> two shots an hour </gasp>. Obviously numbers are misleading, what I actually did was spend more time on setting up a light rig for a particular area/camera angle and then propagated that light rig through to all the shots that need them. Here’s the first pass of the lighting.
Video 1. The opening sequence with first pass lighting, preview render quality
Moving onto lighting – why it’s important
Some may say that lighting is the most important part of the movie, mostly these are lighting artists and people trying to sell books on (CG) lighting. Deciding which element is the most important element in the movie is a debate unto itself (it’s effects by the way J) but lighting is so crucially important in determining the tone and feel of the piece it is certainly worth tackling in isolation.
Lighting strategy
Before even starting the lighting I devised a strategy for completing all the shots on time to a high enough standard that would require as little rework as possible. The date for finishing the lighting was Sunday 16th Jan 11 (yes that’s the Sunday before writing this post) and there is a fair amount of rework to be done... But without a strategy I’d be even further adrift.

Fig 1. I like to know what I want to achieve before I turn on the computer
The main points were to investigate what settings would be useful and what wouldn’t. I spent a lot of time considering whether or not to use Global Illumination and Final Gather. While these obviously beautify an image are they really necessary and worth the extra rendering time? Those of you who have played with these know that it can more than double the rendering time, given that I’m working to a deadline I couldn’t really afford all these extra overheads.
Searching for reference
The biggest task in determining which strategy to use was the use of reference. I stumbled across this excellent blog http://www.evanerichards.com/blog/?p=561 “American Cinematographer” nominates the top 50 best shot films of the last decade. This was a real gold mine, I looked through every one of them and selected the ones that I felt would represent Digitopia the best.
A theme started to occur in the images that I was selecting, they were all low key (i.e. the ratio between the key and the fill was very low, so the key light is much brighter than the fill light) and high contrast. They all had heavy shadowed areas and light on only half the face or around the edges with the eyes mainly in focus.


Fig 2. Deciding on a low key solution – I put the images that appealed most to me over my monitors
I created a mood board and posted it above my monitors to constantly refer to while doing lighting. Of course this was slightly futile since I have to work in the dark as my boy sleeps in the next room. I would however constantly refer to these boards at other times. This strong aesthetic appeared so early I knew that this was the lighting rig I wanted to use. I could now rule out the use of Final Gather and Global Illumination - as awesome as these are they not going to be necessary for me.
Lesson learnt: let the art dictate what you are going to do, not the technology. (repeat three times before going to bed)
Working through the shots
As I alluded to in the intro I knew I had two weeks to get through 54 odd shots, there are five main sequences or areas of interest. My method of working was to aim to get through each area of interest in three nights, the plan being spend two nights setting up all the lighting nuances and then in the third night import and test all the rigs in the other shots that require this light rig.


Fig 3. I would try to spend the bulk of the time making critical choices about lighting
Fig 4. Keeping track of which light rig to use was a task in itself, but time spent well if I need to make any changes.
Render farms vs online rendering services vs render it yourself
At this stage I wanted to focus exclusively on the lighting, the motivation of the lighting and how the story could be told with the use of lights. Actually working without audio at this point really helped focus the attention on the lights and animation to tell the whole story. Having said that it would be incredibly irresponsible to not consider how all of this would be rendered out.
How am I going to render out this (mini) epic? The initial thought turned towards render farms. How practical is the use of render farms and setting one up?
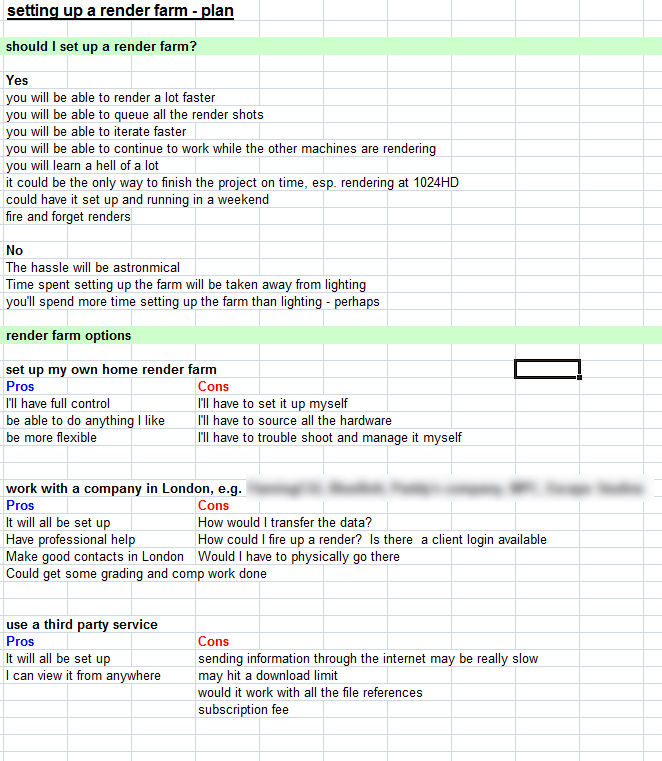

Fig 5. Should I or shouldn’t I?
Does it really make sense to spend a month setting up a render farm that will be used for one month? You do the math.
Given the amount of time it would take to ftp up and down the files and tackling all the dependencies for images and references would be mission in itself. This pretty much ruled out an online service.
Enter the savior - command line rendering
I started to read up about command line rendering. At first all things shell can seem a bit daunting but given the other enormity of the other options it was well worth researching this. It turns out command line rendering is
a) really simple to use
b) a lot faster than batch rendering. You don’t have to have Maya open, all the resources can be tailored to the render and
c) you can stack multiple command lines together in a single .bat file


Fig 6. command line rendering + .bat files = success
If you want to learn more about command line rendering visit the excellent digital tutors website or this very cool link that explains it all too http://www.jawa9000.com/Technical/batch/batch-rendering.htm
So as each shot was lit I would append the path to it to the end of the batch file. When the clock struck midnight (or thereafter) I would force myself to down tools and go to bed (my baby would wake me up soon after and I have to go to work), but not before I double click on the batch file. While I sleep the renders get done!
Note 1: when you do render through a .bat file be aware that all the images will get put in whatever the last folder you had your project set to. It’s not an issue, well it’s not an issue now that I figured it out K
Note 2: you may well get up at night just to check the frames rendered out okay. Don’t do this, it will be fine, sleep, get you energy up for tomorrow’s fight.
Lighting with a GUI that isn’t yet complete
One of the areas of interest is where my character, Libra is interacting with the arcade machine. At this point I don’t have the final GUI (graphical user interface) art for the arcade machine screen. All I have is very crude placeholder screen grabs for what the arcade machine monitor may/may not look like.
I’m working with a very talented artist to do the GUI work (more on that in a future post), we working online together using online meeting clients (working online is a whole post in itself) and discussing and reviewing concepts and WIP (work in progress). The GUI is going to be one of the major sources of lights.
So how can I light without knowing what the source of light looks like?
During our discussions this theme came up several times, the way we resolved it was to come up with an understanding of the story and how the GUI itself would emit different colours depending upon the intensity of the situation. Roughly speaking we managed to get a basic colour scheme of light the GUI will emit through the sequences, of course these may all be up for changes and iterations as we progress.
Next stop – Render City
Now is the winter of our rendering, the upside being when I finish winter will be over and it will be spring. I’ve managed to keep the average render time to around thirty seconds per frame at 720HD, preview quality in Mental Ray. Obviously I will turn up the quality settings but there are two other major components that will add more immersion to the film
a. Motion blur and
b. Depth of field
As I wanted to focus exclusively on the lights I haven’t tested out these techniques yet, but from my research I am going to use the mip_motionblur/mip_motionvector nodes to calculate the motion blur without adding any time on to the renders. This will be a major boon if I can get it working, if you have ever rendered out motion blur you will know how much it increases render times. These mental ray nodes allow for much more control of the motion blur.
To achieve the depth of field I am planning on rendering out an luminance depth layer and together with the camera blur tools in After Effects achieve really controllable depth of field which I intend to animate on some shots to pull focus in particular between Libra and the console/dodo/mammoth.
Countdown to Cannes
In my previous post I wrote I want to get this all done by March 5th 2011 to enter it into Cannes. I would like to spend more time on lighting but as we all know you could spend months and years on it (animation/lighting/rendering/effects) without ever finishing it. The most important thing for this project is to get it to a standard where I can enter it into Cannes, that far outweighs any minor tweaking. It’s the story and its execution that more than any amount of tweaking will deem its success. Need to get this done...


0 comments:
Post a Comment