I always knew I wanted the server to be a collection of LED lights, I want to keep it really retro. The original script called for something far more advanced and complex. I knew that it would be folly to try and emulate and better other GUI displays in films and games so I opted to do something completely different. I wanted the server to be more than just some bleeping lights, I wanted it to be a bit of a character itself.
Here is a video of three iterations of the server.
Video 1. Comparing the three different iterations of the server light animation
Iteration 1 - the blockout
Basically when I made the whole environment I made everything as a placeholder. There were a number of considerations I had to bear in mind when designing the first pass
i) I wanted to get on with the animation – the environment was just meant to be somewhere for Libra to interact with.
ii) I was most concerned with the environment just being to the right scale, I was conscious of the fact that the elements needed to at least resemble what they were actually meant to be.
iii) I started on the original cave idea on 11th Jan 2010 and spent a month on the whole environment. I knew that there would be rework to it, bearing in mind the amount of work ahead with blocking and animation I didn't want to burn myself out at the start of the process. I knew I would be revisiting it after the animation and edit had been locked.
The sides of the server essentially stay the same throughout, the upper portions are ramps plugged into a Surface shader. The lower half have expressions turning on coloured planes on the blue background. I set an attribute called led_on_value with a value between 0 and 1. I then ran an expresson testing whether a noise function was above or below the led_on_value. If it was above then the visibility would be set to 1, if it was below the visibility was set to 0.
if (noise((time * 2) + 20) > led_panel_server_bottom_6|redLed027_1.led_on_value)
led_panel_server_bottom_9|redLed027_1.visibility = 1;
else
led_panel_server_bottom_9|redLed027_1.visibility = 0;
The centre part (considering my final approach this seems a bit of primitive solution) I modelled two sections, a back part which housed the surface shader with a ramp applied and a front section which would a plane with holes punched into it.
Fig 1. the grill in front of a scrolling texture. There’s so many unnecessary vertices being added by this method.
At this stage I was more concerned about the blocking and animation challenges ahead. I just needed something in place to get the ball rolling.
Iteration 2 – removing the grill and adding a noise shader
I decided to keep the left and right parts the same and focus on adding more advanced animation on the centre module. To achieve this I knew it would take more than just scrolling some textures across the length of the plane. I wanted the dots move in a more interesting fashion for the server to feel as if it was alive and running calculations to keep the arcade machine and holograms going.
This time I decided to plug a noise into the surface shader. Into the noise color (colour) gain attribute I plugged in a ramp.
Fig 3. the grills are no longer needed as I’ve built the gaps into the noise shader
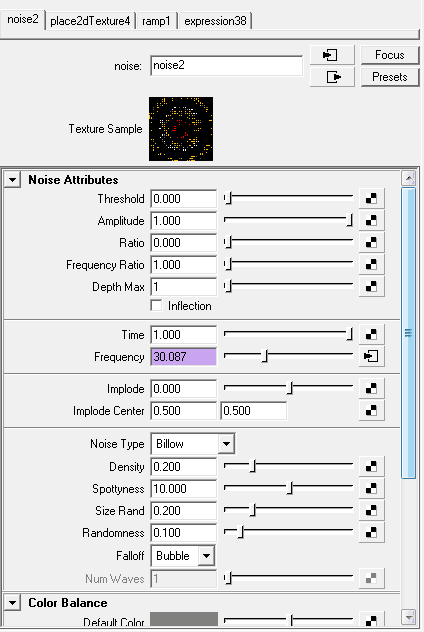
To get the blobby broken up look I set the noise type to Billow and the Density to 0.2. I plugged an expression into the frequency to get some added movement.
Fig 5. noise attributes
Fig 6. the ramp is a circular ramp with no interpolation
I put an expression in the translateU parametere of the place2dTexture of the ramp to scale the speed at which the ramp moves.
Iteration 3 – tuning the animation
This was a lot better than the first pass, but both the speed of the ramp and the frequency was too much. In the final pass I slowed down the translate speed in the ramps move2d node and took out the speed from the frequency altogether.
I did actually want to change the size of the red parts on the side. For some odd reason each time I changed the positions of the red colours in the ramp settings the other glow elements would be blown out completely.
I did actually want to change the size of the red parts on the side. For some odd reason each time I changed the positions of the red colours in the ramp settings the other glow elements would be blown out completely.
Fig 7. All the elements render with a nice glow around them. I don't like how thick the red bars on the left are. They tend to dominate.
Fig 8. moving the red node up would thin out the reds, but it also makes all the other glows overblown as in Fig 9 below.
Fig 9 all the other glows become totally overblown. How can adjusting the ramp on one shader do this? Anyone know how to fix this?
There may be more iterations on the way but I’m conscious of the fact that I need to finish modelling and texturing the environment and the characters. I want to get the environment all finished and be ready to start lighting in time for Christmas, which would be one year since I started this and incidentally the date I planned to finish all this. How’s that for a merry Christmas?*
*at least England are winning in The Ashes (for now anyway)


0 comments:
Post a Comment